Showing posts with label my froggy stuff. Show all posts

Wednesday, 30 May 2018

Making Tiana’s Café


Following the Frozen Doll Room I’ve made another doll room, this time my favourite Disney Princess is getting a new café.


The second doll room I made was Tiana’s Café. In the movie Tiana opened a restaurant – not a café – but with a little creative license I decided to make a café instead. It was a nice little set when I made it but I know that now I could do much better. I also felt like Tiana needed to move to larger premises.

The first thing I made for Tiana’s Café was a kitchen, the plan was to make this outside of the usual cereal box I make doll rooms in and has it rest alongside the box. For this I took a piece of card from a calendar insert which I cut to size and then covered with paper. Using a hot glue gun I secured a shelf onto the wall, there’s also a small bottle cap glued to provide extra support for the shelf. I then used items I’d either previously made or collected to furnish the kitchen for Tiana.


As with many of doll rooms, the main part of the café started out as a cereal box. I cut it to open up one side and then covered the edges and the outside of the box with white paper to neaten it up. This step is taken from My Froggy Stuff on YouTube.


With the box prepared I worked on the exterior of the café. I used a green check scrapbook paper which I thought looked like tiles along the front of the box. I stuck on a piece of wood print scrapbook paper with a picture of a frame and a small handle added on for a door. For the sign I used black paper and a white chalk marker.


For the interior walls I found this green patterned scrapbook paper at a local craft store. I thought this would be perfect for Tiana. Green is one of the core colours Disney use to market her, the pattern reminded me of one of the patterns Disney sometimes uses for Tiana, and I also felt that it had a bit of a 1920s feel to it.


The main walls have been completed so I could add in a little extra detail. I glued in a picture from a Disneyland Paris travel brochure which has been trimmed with white paper for a window. I used a complimentary strip of scrapbook paper to give the room a skirting board and I used a light wood print scrapbook paper for the flooring.


These pictures were on the wall in the old version of Tiana’s Café but I decided that they were still useable and so I glued them into the new one.


I wanted a little stand to display cakes on. I covered a small box with gingham fabric and then hot glued a stand of bunting around it to create a unit to display cakes that is inspired by the ‘Gingham Alter’ from the Great British Bake Off.


The room was pretty much complete so I placed the café next to the kitchen and then added in some furniture.

And that was how I made a new café for (one of) my Tiana dolls. I’m pleased with how this project turned out, I feel like it is a massive improvement from the more basic previous version.

Wednesday, 23 May 2018

Frozen Doll Room


The Forest of Enchantment got Frozen in my latest craft project…

The very first doll room I made was The Forest of Enchantment living room. It was inspired by a stage show I had seen at Disneyland Paris which featured Rapunzel, Merida and Pocahontas. I loved the show and made the room as a little tribute to it and as a way to display those dolls. However over time this room feel out of use and strayed away from its intended purpose. Rather than just put it in the recycling I decided to retheme it into a Frozen doll room.

First step was to strip back the room to just a paper covered box. I chose to keep the green floral wall as it reminds me a little of Frozen Fever. I recovered the other wall with a snowflake patterned scrapbook paper. I used a dark wood scrapbook paper on the floor and a lighter wood scrapbook paper as a skirting board.


I mounted a picture of the Arendelle castle onto another piece of wood print scrapbook paper for a window and then glued it into the box.


Using a hot glue gun, I glued a piece of sequin fabric to the box as a curtain and to help soften the divide between the two wall papers. I also glued a string of silver beads to the box, these were part of the old Forest of Enchantment room but I think they sort of look like lights and I felt they fit the general feel of the Frozen room. A selection of pictures has also been glued onto the wall, I initially considered adding more but decided not to so that I have the option to add more at a later date.

The basic room was compete so I could move the furniture into the room.

This mini drawer had been a part of the Forest of Enchantment room previously. I bought it cheap from The Works (I think it was meant to be a jewlery box), previously I had painted it light blue. To make it feel like a better fit for the Frozen room I used a chalk marker to add some Frozen inspired details.

This couch was from a pack of doll sized IKEA furniture. I used a piece of white fabric with a black print as a blanket thrown on the couch, I chose this fabric as it’s relatively neutral in contrast to a lot of the pattern throughout the room. I also placed some mini cushions I had made previously onto the couch. In front of the couch is a brown faux fur rug which was just cut out from a piece of faux fur that I’d used in a previous craft project.


Every room always needs just a few little extra items to help finish it off and bring the set to life. I like adding things like this to add a little more detail into a doll room. The digital clock and the box of tissues are both from the Disney Happy Places blind boxes I collected.

With the Frozen doll room now complete all that was left to do was move in some dolls. So here’s Anna and Kristoff on the couch with Sven.

Tuesday, 25 July 2017

My Doll Rooms So Far…


So for a while I’ve wanted to do a post where I show off all 7 doll rooms that I’ve made so far. Some of these rooms I have written making of posts for previously but others I have never before shared on my blog. The idea for making a doll room in a cereal box came from My Froggy Stuff on YouTube, I have adapted her ideas to great rooms which suit my dolls.

The Forest of Enchantment Living Room


This one was the first one, the one that started it all. This room was partially inspired by the stage show The Forest of Enchantment from Disneyland Paris. That show features Rapunzel, Merida and Pocahontas who are usually displayed in this room. After I bought him Flynn Rider also hangs out in this room. The furniture in this room often varies and gets changed around to create different arrangements for the dolls to be displayed with.

Tiana’s Café


Given how much I love her I was obviously going to make a room of some sort to display Tiana in! I decided a Café would be more economical than a restaurant in terms of space. Later on I considered making Tiana a bakery inspired by The Great British Bake Off, I ultimately decided not to make this but as I’d already made and bought things for the bakery I created a combined café/bakery. The café is a great set for displaying various dolls in, at the moment Anna, Jasmine, Supergirl and the Winter Soldier are having afternoon tea in Tiana’s Café!

Megara’s Greek Villa


I came across a picture of a Greek island from an old calendar of my mum's and realised I could use it as a large window in a doll room. Megara’s Greek Villa was the result. This is one of the more simple rooms I have made but it’s an effective one for displaying Megara. Later on Hercules joined Megara after I found him for a pound in a charity shop.

The Art Gallery


Out of all the rooms I’ve made this is the one which follows a My Froggy Stuff tutorial the closest. The bench means this is a great set for displaying dolls who have unarticulated legs and can’t stand. One of my favourite things about this one is that it can be rearranged to create different spaces. Also the postcards that are on the wall as paintings in the gallery are just blu-tacked on so they can be removed to create different exhibits.

The Disneyland Paris Room


I wrote about how I made this one here and little has changed since I made it. The seating in this room gets changed relatively frequently depending on what is in use. This room has been a good one for displaying various Disney dolls in.

The Bookshop


I wrote about how I made this one here, since I made it I have added another bookcase which was previously in The Forest of Enchantment Living Room. One of my favourite things about the bookshop is that it has a lot of detail without looking cluttered. As you might expect, since I bought Belle the other week she has been in the book shop a lot.

Batgirl’s Batcave


I wrote about how I made this one here a few weeks ago. I’m still very pleased with how this set came out, this has been a great set for just displaying Batgirl.


So that’s it for now. I have plans to make more doll rooms in the future however for now there’s nothing definite in the works. Possible upcoming rooms include a beach hut, a space station based on the Star Tours Ride, a new Avengers HQ, a room for Mulan, a room for Jasmine base on Agrabah Café at Disneyland Paris or some sort of Frozen room. Mostly it depends on what dolls I feel could have their own room and what supplies I have available.

Friday, 7 July 2017

Bargirl’s Batcave – A Doll Room Craft


I’ve made another doll room, this time its Batgirl’s Batcave made for my DC Superhero Girls Batgirl doll. As always with my doll rooms, I was part inspired by My Froggy Stuff on YouTube.


Sometimes a project will just no longer work quite as well as it used to. This was the case with the Superhero Hang Out doll room as since I made that my collection has expanded massively. However rather than just throwing it away I decided to repurpose it into a Batcave for Batgirl. I cut the Avenger’s half of the original room off. I then covered the rough edges with a navy paper to neaten them. I also changed the floor with a dark wood grain paper.


In cutting down the Superhero Hang Out the room had lost some of its size. I took a cereal box and cut one side and one larger piece off it so that I could attach it to the original box and expand that amount of space in the Batcave.


The Batcave is always hidden in plain sight and this was something I wanted to reference in my doll room. I covered the side of the box that would be on the front of the outside with some of the box art from one of my DC Superhero Girl’s dolls. I then added a strip of paper across it and some red paper around it to create a backdrop that should resemble a room with a large window.


Batgirl has always been a techie and so I knew that I needed to make sure she had several computer monitors in her Batcave. I made a printable of various computer screen using images of some of my favourite superheroes – yes, there’s Grant Gustin as the Flash! I glued these screens onto card and cut them out so that they had some depth. I stuck the six screens that I chose to use onto a piece of black card.


With the screens mounted I then decorated the wall that would be on the inside of the Batcave. I used a brown paper for the top section, I covered the bottom section with the same navy paper that I’d edged the other half of the Batcave with to visually link to the two parts together. I then stuck the mounted screens onto the wall. With the inside wall completed finally I could attach the two sides of the Batcave together.


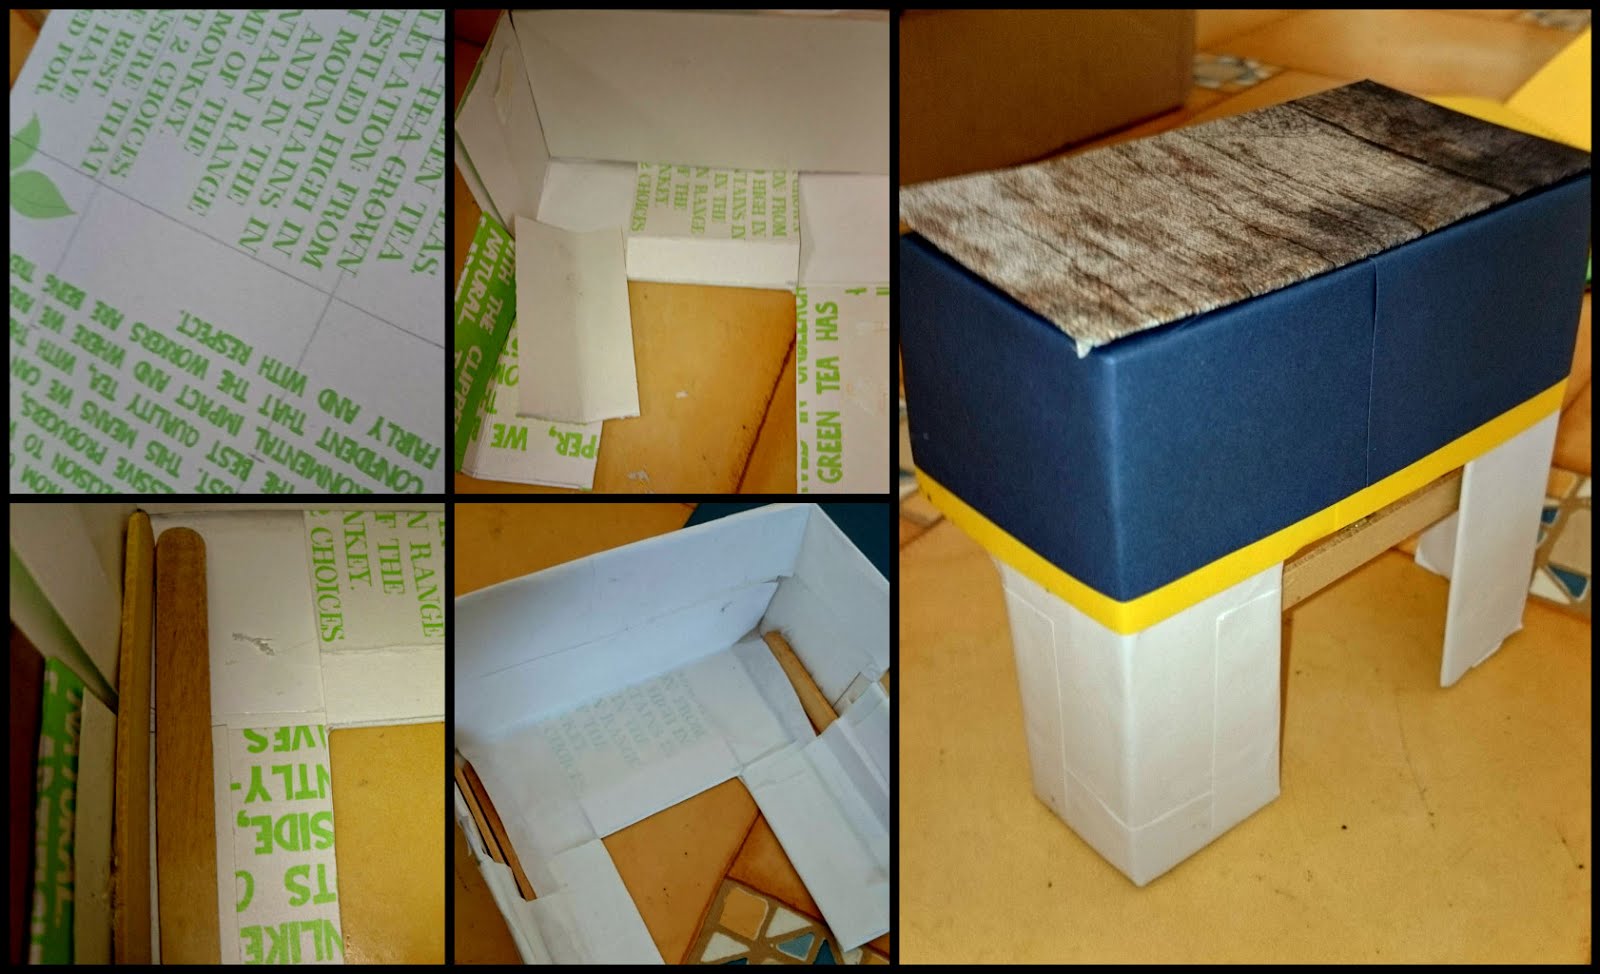
The desk was important to make properly as it is main piece of furniture within this room. I started with a tea box that I marked up with measurements based on the Batgirl doll. I then cut the box based on my markings and reinforced the sides with left over of card. I also hot glued some ice lolly sticks to further strengthen the sides of the desk. Next I covered up all the joins with paper – this helps to neaten the overall appearance but also gives the desk a bit more strength. I kept the legs of the desk white and then used the navy paper that I’d used elsewhere with a yellow trim to cover the top part. I finished off the desk with a piece of card covered in wood grain paper to create a dark wood top to the table.


Before I could finish making and begin begin decorating the Batcave there was one last detail I wanted to add. I hot glued the ring from a bottle into one corner of the box and then pulled a length of black tulle through it. This creates a curtain that adds a little more depth to the Batcave and also gives a touch of black without making the whole appearance of the room too dark.


Now I could move things into the room. The desk fits in well, I used a chair that’s actually a phone holder I found on Amazon to go with the desk and I made a cushion for the chair. I placed some techie items which are actually printables from My Froggy Stuff on the desk along with a few doll accessories.


And that is how I made a Batcave for the DC Superhero Girls Batgirl doll. This was a surprisingly labour intensive project but I am really pleased with how it turned out.

Tuesday, 30 May 2017

Doll Book Shop – My Latest Craft

I finished my latest craft project today, making a doll sized book shop!


I’m a literature student and I love collecting dolls and making rooms to display them in so I guess it was only a matter of time before I made something like this! I took inspiration from tutorials by MyFroggyStuff on YouTube and combined that with my own ideas. Before I started I wondered if this project was going to be too ambitious but I’m really pleased with how it turned out.


As with all my doll rooms, this started off as a cereal box that I cut open the front side on and then covered the edges in paper.


Next I started to make the outside of the bookshop. Using a doll as a guide I cut out a piece of wood grain scrapbook paper to be the door. The wood print paper is from that pack I found in my haul the other week. I cut out a sign for the shop and a window that I’d made on the computer and printed out. The window is a photo of some of my books that I edited so it looked like a window display.


Usually I don’t bother decorating the outside of the box but on this occasion I wanted to make a shop front. I covered half of the outside with white paper and half with more wood grain scrapbook paper. I then glued the sign, window and door onto the box. Now the store front is finished.


With the exterior completed it was time to start working on the inside. I used a doll as a guide to figure out what would be the right size for this book print scrapbook paper I found in Hobbycraft. Once trimmed down I glued the book print into the box and then covered the bottom half with white paper.


I decided to use more wood grain paper to cover up the seam between the two sides of the book print paper and suggest a beam in the shop. I then used (even more) wood grain for the flooring and glued in another edited picture for a window. This is a photo of a street that I took in San Francisco, I guess that means this book shop is in California!


With the basic room completed the book shop needed furnishing. I found this box in The Works, I think it’s meant to be a jewellery box but I’m repurposing it as a book case. I made mini books by gluing images from flyers, catalogs and leaflets onto card from an Amazon order. The books fit nicely into the book case and went in the room.


For some finishing touches I took a frame that I had left over from The Superhero Hangout and framed this little quote from The Doctor (if you’re wondering the quote is from 2006’s Tooth and Claw). I also added the ottoman poofs that I had made previously from a MyFroggyStuff video, they’re really easy to make as they are just old socks!


So here’s the finished room with various dolls using it! I like that this is a room which can be used by various characters. This room has a lot of pattern and texture however it doesn’t feel like it’s too much. I also like that it’s a space that I can expand further with the potential to add extra books and extra shelving units in the future.

Friday, 14 April 2017

My Disneyland Paris Doll Room


I’ve been busy crafting today and this time I made a Disneyland Paris doll room, I thought I’d do a brief post about how I made it. As with the Superhero Hang Out I made back in October this craft was inspired by tutorials from My Froggy Stuff on YouTube combined with my own creativity.


First off I took a cereal box, cut it down the centre and covered the edges and base with paper. This part is a little tedious so I had a cup of tea whilst doing it. The wonderful thing about using cereal boxes to make doll rooms is that they can be folded up for easy storage.


I next covered the main section of the box with a floral scrapbook paper. I chose a floral print as I have mainly been to Disneyland Paris during spring. The roses in this pattern also suggest a small reference to Beauty and the Beast and Sleeping Beauty.  I cut out the Disneyland Park map (I picked up a spare when I was there a few weeks back) and glued that into the box.


The side walls got covered in a snowflake patterned paper. I chose a snowflake pattern as a little visual reference to Frozen, appropriate given Elsa and Anna are regulars at Disneyland Paris these days.


With the main wallpapering done it was time to add the details. I mounted a picture of Olaf in a Disneyland Paris firework show to look like a window. I trimmed the bottom of the box with a gold tape to act as a shiny skirting board.


The room needed a piece of furniture. I made a little side table to go in this room by hot gluing an empty cotton reel, the lid from a coffee jar and an old candle stick together. I used left over images from the park map to make doll sized park maps to go on the table.


Some small finishing details were then needed to complete the room. I stuck a cut out from the back of my Frozen calendar from last year on to the wall to create a doll sized calendar. I used a length of netting with green stars to look like a curtain and secured it behind the box. I also placed a Vinylmation figure - which I bought from my first visit to Disneyland Paris – in front of either side wall.


And that’s it! Not my most advanced project ever but certainly an effective one. This space feels to me like it could be a room in Main Street or Fantasyland where people can pop into for a break whilst exploring Disneyland Paris. It’s certainly a good backdrop from characters who are often found at Disneyland Paris – as Elsa, Flynn, Rapunzel and Tiana are proving there!